Step by Step Tutorial on How to Build Your Own Box with PVC Pipe

After owning llamas for 11 years, I am finally starting to get interested in producing things with their wonderful fiber. Up until last year, we had been sending all of our fiber to mills that would process it from the fleece into a finished product, such as socks, rugs, scarves, and mittens.
I decided last year to have my llama fiber spun into yarn so that I could learn to make things myself. I have really enjoyed working with the yarn from my very own llamas. It is so soothing to feel its softness slip between my fingers as the intertwining loops grow into a finished creation.
I’m still very new to this process, but one thing I have learned is that there is a definite cost benefit to taking the extra time to prepare your fiber before sending it to a mill, or before processing it yourself if you are clever enough to be a spinner. When the mill receives your fleeces, the fees are initially based on the incoming weight. By the time it is processed into yarn, you can lose up to 50% of your initial weight if you haven’t cleaned it up a bit beforehand.
I’m only talking about llama and alpaca fiber here, as sheep wool contains lanolin, and requires additional steps, which I’m not going to go into. Before shearing, we carefully blow out our llamas to remove vegetation and dirt.

Blowing out the dust

How llamas get so dirty in the first place
Then we brush them to further remove vm (vegetable matter). But even so, there will be junk that remains stuck in their hair. Then there are the inevitable second cuts, the small pieces of short fleece remaining in the fiber, caused by shearing the same area twice. All this waste will be processed out, but adds to your incoming weight.
Now— an easy way to clean up that fleece right off the animal, the Fiber Blow Out Box. (It’s still best to clean the fiber as well as you can while it is still on the animal). Just put your shorn fleece into the box and blow it with a Circuiteer high speed blower, or a leaf blower will do. This allows the fleece to tumble and separate so that the dust, trash, and short fibers are blown out of the mesh of the box.

blowing the dust out of the fiber–off of the llama.
I saw a version of a fiber blow out box at a recent llama conference and came up with a simple and inexpensive way to make one myself. I’ve been using PVC a lot lately in building agility equipment for my Goldendoodle pup, Bayley. PVC is lightweight, inexpensive, and very easy to work with. I’m not a “tool girl” and I only need one tool to make most anything with PVC.

PVC cutter. This one cost about $10.
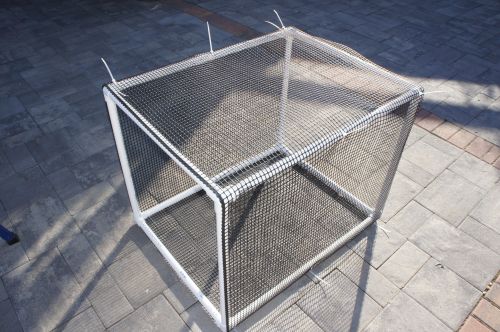
These are the instructions for making your own blow out box. It will take a couple of hours and will cost less than $30 in materials. The finished size is 24” x 34”.
It is important to be accurate when cutting and gluing, making sure each pipe is fully seated in its connector, and your squares are as true as you can make them.
TOOLS
PVC cutter
Sharpie marking pen
Measuring tape
MATERIALS
You will need three 10′ lengths and one 5′ length of ¾” Schedule 40 PVC pipe. All of the connectors are for ¾” pipe. I designed the box with these measurements to minimize waste. If you cut one piece of 10′ pipe into four 22″ pieces, you will have 32″ left over for your side pieces. The fourth piece of 32″ pipe will be cut from the 5′ section.

All the pre-cut pieces, ready to be assembled
1. 90-degree slip connectors (4)
2. 3-way corner fitting connector (8)
3. 22” pipe sections (12)
4. 32” pipe sections (4)
5. ½” plastic hardware cloth (36” by 15′)
6. White cable ties (8″ long) (100)
7. White Cable ties for door hinge (12″ long) (4)
8. Glue (see comments below)
9. Two 10″ mini bungee cords
ASSEMBLY
Let’s start with the 24” end squares. There will be 3. One square will serve as your opening door.

2 end squares and the door panel
Start by gluing four 22” sections to four 3-way corner fittings. Once your square is assembled, place it on a flat surface and adjust so that it lays flat.

24″ end square with 3 way corner fittings
A NOTE ABOUT GLUE
I don’t recommend using the PVC glue that is sold in the plumbing section. This stuff bonds IMMEDIATELY and does not allow for any readjustment that will be necessary to make sure all of your angles are true. Since this doesn’t have to meet a water pressure test, I have found that a plastic epoxy works wonderfully. This glue sets up in from 10 to 20 minutes, allowing you to tweak the joints once they are assembled.

Plastic welder
Make the second end square the same way. Then make the door square using four 22” sections and the four 90-degree connectors.

Square for opening door with 90 degree corner fittings
Place one of the end squares flat on the floor, and stick one of the 32” sections in each joint gluing as you go. Then place the top end square in place and glue, pressing firmly to assure the pieces are fully seated.
Your box frame is now complete and ready to be wrapped in the plastic hardware cloth.
Cut the plastic netting to 9′. This will be too long, but we will cut it to size once it is attached to the frame. Lay the netting out on a flat surface and place the box on top so that one end of the box is aligned with the edge of the net. You want the net to be the exact width of the box, so go ahead and cut the net to the correct width. It should be 34″ wide.
Place one of the end squares on the remaining net and cut two pieces. They should be 24″ square.
My advice, measure the net to the frames before cutting it. There could be variations in the dimensions of your box.

Laying out the netting
Now line up one edge of the box with the 34″ edge of the plastic net.

Position frame along edge of netting
Attach the net to the PVC pipe with the 8″ cable ties. I put 3 on each pipe, pulling the net tightly as you wrap it around. Once the net is secured, go back and put a couple more ties on each rail and trim off the tails. You can get an idea of what we did in this photo.
Initial wrap with 3 cable ties on each rail

Finished wrap with 5 cable ties on each rail
Attach the net to one of the square ends, but leave the other end open. This will be your door opening.
Then attach the net to the square that you made with the 90 degree corner connectors.

Attach net to door square
Now you are ready to attach the door to the box. For hinges you will use the 12″ cable ties. Connect one side of the door panel to a top rail of the open end of the box. 3 ties should be enough, and don’t tighten them down too much. You want the door to swing easily but not be too loose.

Use 12 inch cable ties to attach the door.

The door should swing easily.
To secure the door, use the two 10” mini bungee cords. It’s quick and easy to “lock” and open the door to load your fiber.

Bungee latches
Now you’re ready to try it out.
Load one fleece at a time. You want the fibers to be able to separate and move around as you are blowing it out.

Blow Out Box with 1 Raw Llama Fleece
Use a circuiteer high speed blower or a leaf blower and blow air into the box. There will be a lot of dust flying, but it doesn’t show in the photos.
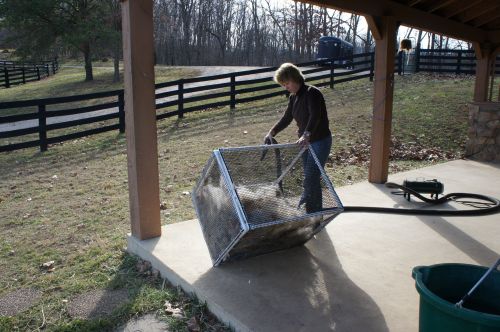
Keep rotating the box and blowing up under the fiber to keep it moving. When you don’t see any more dust, (it’ll take about 5 minutes or so), it’s done.

You fiber should now look clean and fluffy.

Fluffy fleece
You may find some remaining longer pieces of grass and hay that is still in the fiber. The longer stuff won’t be blown out of the small holes in the net. This stuff you will have to pick out by hand.

Long hay pieces may remain.
In the future we’ll try to make sure our floor is clean when we shear. I know what happened here. We had a hay bag by the shute to keep the llamas entertained while we sheared, and they dropped pieces of hay into the cut fiber on the floor.

Shearing Santiago
As I said earlier, it is much easier to clean the fiber while it is still on the llama. Time spent on this step is not wasted. This blow out box will not clean a filthy fleece. It will merely remove any dust, dirt, small second cuts, and bits of vegetable matter that may remain in a relatively clean fleece. You might want to use a 1 inch plastic hardward cloth, but I was afraid of losing too much of the good fiber.
Please let me know if you decide to build one of the boxes. You might come up with even better ideas that I would love to hear about.
Next, I’m going to run this fleece through a drum carder to make it into batts that I can use for my needle felting and wet felting projects. I’ll let you know how that comes out.


